
Add and remove liquidity
You add liquidity to a GAMA DEX pool in three steps: choose the pair, set a price range and deposit the tokens. This page walks through each step, then shows how to add more, collect fees and withdraw. It assumes you know what a liquidity position is; if not, start with Pools and positions.
Before you start
- Connect your wallet on GIWA Sepolia and hold both tokens, or ETH and one token. See Connect a wallet and get test ETH.
- A launch token can take liquidity only after it graduates. Before that, the form says "This token is still on its bonding curve; liquidity opens when it graduates." and links to its curve.
- Liquidity you add is yours and stays withdrawable. It is not the same as the locked liquidity a launch adds at graduation.
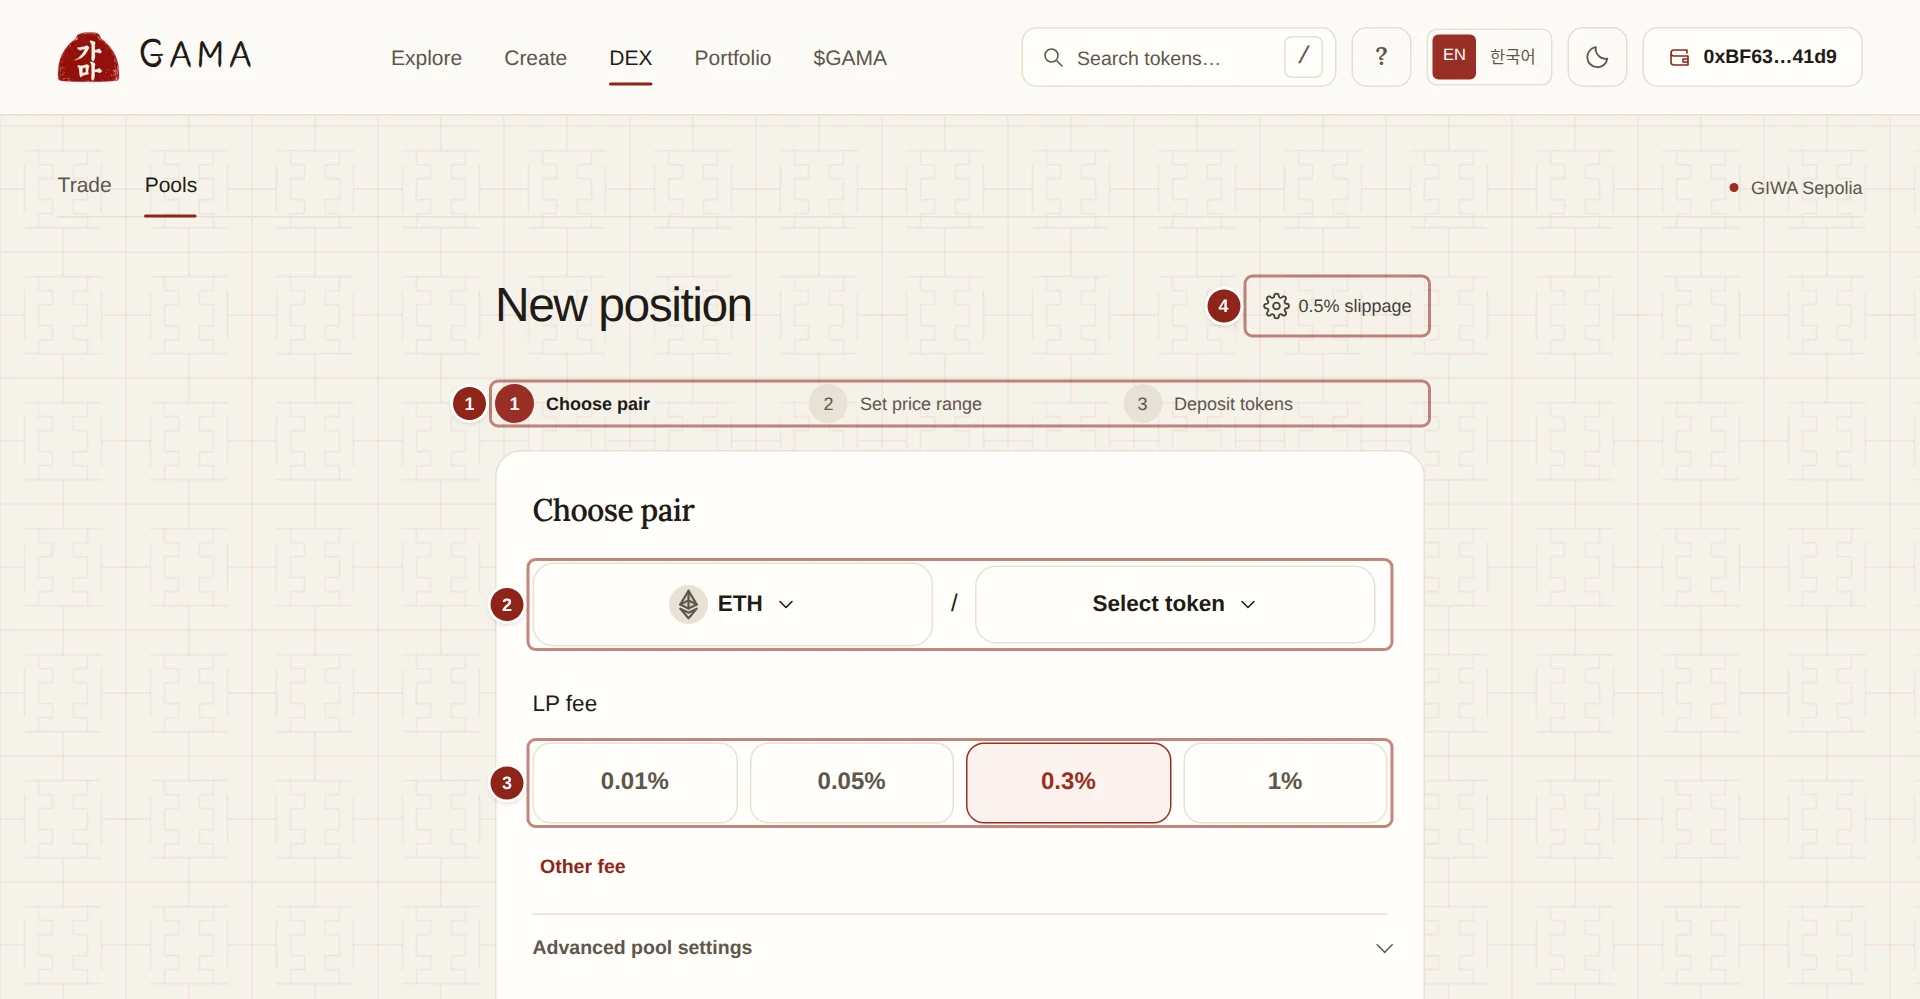
- Choose pair, Set price range, Deposit tokens: the three steps. A tick marks each one you have finished.
- Choose first token and Choose second token: the two tokens of the pool.
- LP fee: the fee of a new pool, 0.3% unless you choose another.
- Trade settings: the slippage the deposit allows.
Add liquidity
- Open DEX, then Pools, and choose New position. From a pool's own page, Add liquidity starts at Set price range with that pool already chosen.
- Choose pair. Pick the two tokens. If pools already exist for the pair, Choose an existing pool lists them, with a launch's official pool first ("Official pool for this token’s launchpad trades"). Pick one, or open Create a different pool.
- For a new pool, choose its LP fee: 0.01%, 0.05%, 0.3% or 1%, or Other fee for any other. Advanced pool settings has the Tick spacing, a Hook address and Dynamic LP fee. Leave them as they are unless you know you need them. You can't change a pool's fee, tick spacing or hook later. Choose Continue.
- Set price range. Choose Full range, or enter a Minimum price and a Maximum price. Each price is shown as an amount of one token per one of the other, as labelled; Invert price flips them. A new pool has no price yet, so you also set its Initial price. Creating the pool and your first deposit then happen in one transaction. Choose Continue to deposit.
- Deposit tokens. Enter either amount. The other fills in to match the current price and your range. If the current price is outside your range, you deposit only one token, and the form marks the other "This asset is not needed for the selected range." Choose Review deposit.
- Review deposit lists the pool fees, the Maximum deposit of each token, the Range and your Slippage, then the steps your wallet will show: Approve tokens if needed, then Add liquidity (or Create pool and add liquidity). Choose Confirm deposit and confirm each step in your wallet.
Unused amounts return to your wallet in the same transaction. The new position appears under Portfolio, then Liquidity.
TIP
A full-range position is the simplest choice: it earns fees at every price and never goes out of range. A narrow range earns more of the fees while the price stays inside it, and nothing once the price leaves.
Approvals and slippage
ETH needs no approval. For each other token, the app asks your wallet for two approvals, and only when the current ones are too small:
- the token approves Permit2 for exactly the amount you deposit;
- Permit2 then lets the position manager use that amount, until the deposit's deadline 20 minutes later.
See Token approvals for what an approval allows.
Your slippage setting limits how much the price may move between your review and the transaction. If it moves more, the deposit fails and your tokens stay in your wallet. The default for pools is 0.5%; the app warns you when you set more than 5%.
Manage a position
Open Portfolio, then Liquidity, and choose Manage on the position. Its page shows the pair, the LP fee and whether the position is In range, Out of range or Closed, with its Deposited tokens, Uncollected LP fees and Price range. Only the current owner of the position NFT can change it.
Increase liquidity
Increase liquidity opens the deposit step for the same pool and range. Adding to a position also pays you the fees it has earned so far.
Collect fees
Collect fees sends you the position's uncollected LP fees without touching its liquidity. Review, then Confirm collection.
Remove liquidity
- Choose Remove liquidity.
- Pick 25%, 50%, 75% or 100%, or type the share under Liquidity to remove.
- Check Minimum received, the least of each token you accept at your slippage. You also receive any fees the position has earned.
- When you remove 100%, you can tick Close position and burn the NFT. Otherwise the empty position NFT stays in your wallet.
- Choose Review withdrawal, then Confirm withdrawal.
Change range
You can't change a position's range. To use a new range, remove the position, then add the tokens to a new one.
WARNING
A position NFT is the position. If you send the NFT to another wallet, that wallet controls the liquidity and its fees. This cannot be undone.